Introduction
Excel provides the capability for the user to name specific ranges, values, and formulas. In Excel 2010 this feature is accessed from the Formulas menu of the ribbon.
This post deals with adding individual names. It is also possible to add multiple Names for cells and ranges at a time, using a slightly different method. That will be the topic of a different post.
Adding the Names
Accessing the New Name dialogue
All of the instructions in this post use the same steps to access the New Name dialogue.
 |
| Formulas menu, name management highlighted |
- Activate the Formulas menu
- Click on Define Name...
- When the dialogue appears, type in the name for the Name
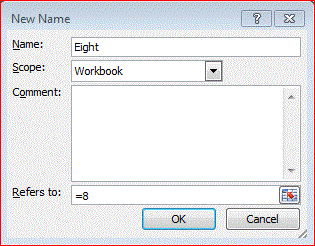
 |
| New Name Dialogue |
- Name: If there is a value in the active cell it will be displayed here. This is to facilitate naming of ranges. Spaces will be replaced by under
- Scope: Typically this will say "Workbook". The drop-down allows the user to select any worksheet for scoping, or the workbook. If there is scoping conflict (i.e. duplicate Names scoped to the Workbook or a worksheet) an error is displayed when trying to save.
- Comment: Free-form. Always blank for a New Name
- Refers To: Default is the currently selected range. defaults to the current selection. Changing the Refers To: box can be done by over-typing/editing or using the selector.
...a Name for a Value
This is not intuitively obvious as to when it would be useful. One use is to put boilerplate text or names of companies etc, then use the Name within a string-manipulating formula.
- Access the New Name dialogue (above).
- Delete what is in the Refers To: box, then type the value, leading with an equals sign. If entering text, use double quotes, e.g. ="This is the value"
- Click OK
Try adding Names "Seven" and ""Eight" but fill in the Refers To: as =8 and =7 respectively. The formula =Seven*Eight returns "56", a case of right answer, wrong process.
...a Name for a User Defined Function
- Access the New Name dialogue (above).
- When the dialogue appears, the new name in the Name: box.
- Delete the contents of the Refers To: box then type/paste the formula with a leading equals sign ("="). For example, if the UDF is "fnCalculateSomething" then the Name: box might be "CalcIt".
NOTE: The workbook must be saved before the new Name works correctly.
- Click OK
NOTE: The workbook must be saved before the new Name works correctly.
...a Name for a Complex Formula
There are times when a complex function might be written once and re-used over and over. Rather than trying to maintain all of the instances, the formula can be put into a Name then referenced.
- Access the New Name dialogue (above).
- When the dialogue appears, the new name in the Name: box.
- Delete the contents of the Refers To: box then type/paste the formula with a leading equals sign ("=").
- Click OK
...a Name for a single Cell
This is commonly used for referring to input fields and intermediate results, e.g. a summary sheet may refer to a named cell on another sheet or a formula may use the input field for a calculation or first argument of a look-up.
- Select the cell to be named.
NOTE: If you miss this step you can fix the problem in step 3.
- Access the New Name dialogue (above)
- Type the new name in the Name: box.
- Confirm the cell address in the Refers To: box. If not correct, change by editing or using the selector.
- Click OK
...a Name for a single Range
NOTE: If you miss this step you can fix the problem in step 3.
This is often done when identifying a range to be used in a statistical function, including SUM(), as well as when using for reference in xLOOKUP()s.
- Select the range to be named.
NOTE 1: If the name of the range is in a specific cell, e.g. the top cell of a column, by selecting beginning with that cell the Name: box will be populated with correct name.
NOTE 2: Named ranges do not need to be contiguous.
NOTE 3: If you miss this step you can fix the problem in step 4.
- Access the New Name dialogue (above).
- When the dialogue appears, if needed, type the correct name in the Name: box.
- Confirm the range address in the Refers To: box. If not correct, change by editing or using the selector.
- Click OK
NOTE 1: If the name of the range is in a specific cell, e.g. the top cell of a column, by selecting beginning with that cell the Name: box will be populated with correct name.
NOTE 2: Named ranges do not need to be contiguous.
NOTE 3: If you miss this step you can fix the problem in step 4.
No comments:
Post a Comment