Friday, February 9, 2018

Spell Checking Protected Worksheets

The Problem

When a worksheet is protected (locked) the Spellcheck feature is unavailable, even for unlocked cells.  When the purpose of locking is to protect all data this makes sense.  However, when the purpose is to have the user add information to a form, where locking of labels and their locations is important, the spellchecker can be a useful feature for the users.

Option 1 - User Run Macro

This is all over the internet, including Microsoft's support site.

This solution adds a VBA procedure to unlock the worksheet, run spell check, then re-lock it.  All versions look something like this.


Sub SpellCheckSheet()
   ActiveSheet.Unprotect "password"
   ActiveSheet.CheckSpelling
   ActiveSheet.Protect "password"
End Sub

This requires the user to open the macros, select the macro from the list, and running it.

If this is the only Public procedure, then it's relatively simple.  However, with each additional Public procedure it becomes more onerous for the user.  Imagine the frustration if this were added as a worksheet procedure because there were different protections for different sheets, or different passwords because there were different owners.

Option 2 - Worksheet Event Lock & Unlock

Thinking about the issue a little more, it came to me we we only need to spell check the Unlocked cells.  By default, all cells of a worksheet are locked.  When we want people to add information while the worksheet is protected, we change those to unlocked.

Right?

Since there is a Worksheet Event that triggers when the selected cell(s) changes, we can use that to automatically Protect/Unprotect the Worksheet.
  • User selects (clicks on, tabs, drags) another location on the worksheet.
  • Selection Change Event triggers, picking up the selected range as "Target"
  • Code checks the condition of Target's Locked property
  • If Target is unlocked, i.e. Target.Locked is False, then the sheet protection is turned off
  • If the Target is not unlocked (see note below) the then the sheet protection is turned on


Private Sub Worksheet_SelectionChange(ByVal Target As Range)
    With Target
        If Not .Locked Then
            .Parent.Unprotect "password"
        Else
            .Parent.Protect "password"
        End If
    End With
End Sub

This can be added to any worksheet that needs protection and spellchecking, leaving the others alone.  For example, if there are worksheets available for managerial reporting that roll up to one for the director the Worksheet module can be included in all of the managers' worksheets.

Two notes 

The Worksheet is Protected whenever any cell in a selected range (one or more cells) is Locked.  If the cells in the selected range are...
  • All Locked?  Worksheet is protected because Target.Locked is True.
  • All Unlocked?  Worksheet is unprotected because Target.Locked is False.
  • A mixture of Locked and Unlocked?  Worksheet is protected because Target.Locked is Null.
Selecting Objects on the worksheet does not trigger the Worksheet's SelectionChange Event.  This event triggers only when a cell, or range of cells, is selected.

Option 3 - Workbook Event to Lock & Unlock Worksheets

With minor modification the same VBA code can be attached to the Workbook's SheetSelectionChange Event.  

Private Sub Workbook_SheetSelectionChange(ByVal Sh As Object, ByVal Target As Range)

    If Not Target.Locked Then
        Sh.Unprotect "password"
    Else
        Sh.Protect "password"
    End If
End Sub

The issue with this is it locks and unlocks all worksheets.  So, if a new worksheet is added it will need to be Unprotected, and at least one cell Unlocked before anything can be added to it.

Option 3.1 - Control with Worksheet Naming Convention

To get around the limitation of worksheets being locked when they shouldn't, a naming convention for worksheets can be used.  For example, using the idea that departmental managers are providing inputs, each of those worksheets could have "Dept" in their names, e.g. "Acctg Dept", "HR Dept", or "Dept of Hip".

Private Sub Workbook_SheetSelectionChange(ByVal Sh As Object, ByVal Target As Range)
    If Instr(1,sh.Name,"Dept") > 0 then
        If Not Target.Locked Then
            Sh.Unprotect "password"
        Else
            Sh.Protect "password"
        End If
    End If

End Sub

Option 3.2 - Control with a Worksheet-Scoped Name

...in development

Thursday, November 16, 2017

Weekdays in a month.

The Opportunity


How many days in a month? showed following table, created using the EOMONTH() function, plus NOW() and a bit of formatting.
This is fine, but most organizations think in terms of weekdays.  Therefore, the following was created by hiding 3 columns (D, E, and F) then and adding four.

What's New

First Week Day calculates the first day of the month then adjusts "forward", adding days if the first of the month is a Saturday or Sunday.  
  • First Day of the Month.  As before, this finds \the last day of the previous month, then adds a day
    EOMONTH(NOW(),A2-1)+1
  • Adjust for Saturday or Sunday, by adding 1 day for Sunday or 2 for Saturday
    +IF(WEEKDAY(EOMONTH(NOW(),A2-1)+1,11)<6
      ,0
      ,8-WEEKDAY(EOMONTH(NOW(),A2-1)+1,11))
    • Test if this is Saturday of Sunday
      WEEKDAY(EOMONTH(NOW(),A2-1)+1,11)<6
      • EOMONTH() returns the last day of the Month
      • Weekday(date,11) returns 6 for Saturday,  7 for Sunday
        (Note: WEEKDAY(<date>,2) would do the same) 
    • Adds 0 if this isn't Saturday or Sunday
    • Calculates how much to adjust if Saturday or Sunday
      • WEEKDAY(<date>,11) ) returns 1 for Monday through 7 for Sunday.
      • Subtracts WEEKDAY() result from 8, making the forward adjustment one day for Sunday (7), two for Saturday (6).
Last Week Day takes the EOMONTH() date then, if the last day of the month adjusts to the previous Friday.
    =B2-MAX(0,WEEKDAY($B2,11)-5)
  • Last Day of the Month, as before, is calculated in column B.
    =B2
  • Adjust for Saturday or Sunday, this time by subtracting 1 for Saturday, 2 for Sunday
    -MAX(0,WEEKDAY($B2,11))-5)
    • As before, if this is not a weekend day, make no adjustment by returning 0
      because subtracting 5 from 1 (Monday) through Thursday (4) returns a negative, meaning the maximum is 0.
    • If it is a weekend day, the WEEKDAY() function returns 6 (Saturday) or 7 (Sunday).
    • Subtracting 5 from WEEKDAY() for Saturday result in moving the date back 1 day, Sunday for 2 days,
Days from 1st to Last Weekday calculates how many days are in this adjusted work month simply by using the DAYS() function, then adding one to make it inclusive of the first day.

Weekdays in Month.  Could have built a table of  dates for the months then used a complex COUNTIF() statement/  Instead I wrote the following VBA function.
Public Function Workdays(StartDate, EndDate) As Integer
' Returns how many workdays from a starting date to an ending date
    Dim i As Integer
    Dim FirstDate As Date
    Dim LastDate As Date
        
    For i = 1 To LastDate - FirstDate
        If Weekday(FirstDate + i, 12) < 6 Then
            Workdays = Workdays + 1
        End If
    Next i
'    Workdays = EndDate - StartDate + 1
End Function

Wednesday, November 15, 2017

How many days in a month?

What's an EOMONTH?

Recently I saw a post referenced in an email that mentioned the EOMONTH() function.  Given a date, plus the number of months before or after that date, it returns the last day of that month.
=EOMONTH(StartDate,MonthOffset)

For more, here is the "official" Microsoft entry, as of today.

I had never used it, but it seemed interesting.

Cute trick, but so what?

This made me think of the number of times I needed a rolling table for reports, showing results and/or forecasts, so I built a simple table of twelve rows.


The only data to enter is the first Relative Month, cell A2 for the example.  In this case, "-5" is five months  in the past from whatever date is used to seed EOMONTH().  The remainder of the Relative Month column is simply adding one to the cell above it: Cell A3 is "=A2+1".

For this example I used NOW() to provide the starting date.  

=EOMONTH(NOW(),A2)

Where's the date?

I found the normal date formats to be somewhat less interesting than the component parts, so I formatted column B, where I put the EOMONTH() function using the "mmmm" formatting.

For column C I used "yyyy"; D & E "dddd"and F "dd".  That gives me the name of the month, the year, the names of the days of the week, and the last day of the month as the number of days in the month.

As another alternative, you could use the FORMAT() function or
  • B2 =CHOOSE(MONTH(EOMONTH(NOW(),A2)),"January", "February","March", "April", "May", "June","July","August","September", "October","November","December")
  • C2 = YEAR(EOMONTH(NOW(),A2))
  • D2 = CHOOSE(WEEKDAY(EOMONTH(NOW(),A2)),"Sunday", "Monday","Tuesday", "Wednesday", "Thursday", "Friday","Saturday")


No need to overuse EOMONTH()

I then entered "=$A2" in cell C2, copying down then dragging down the columns.  

"Why?", you may ask, "Don't you just repeat the formula?"

Several reasons:  
  • Speed of recomputing the worksheet
  • Fewer points of failure if I have a mistake
  • I'm lazy

First of the Month

I can come up with a couple of ways to use worksheet functions to get the first day of the month, column D, iI including variations of the above.  Another possibility might be , keeping with the "re-use column B" motif, "=DATE(YEAR(B2),MONTH(B2),1)".

I settled on finding the last day of the previous month ("EOMONTH(NOW(),A2-1)"  then  adding "1" since I knew that in the Microsoft world "1" is a day/ 
=EOMONTH(NOW(),A2-1)+1

This was already formatted with "dddd".


Wednesday, October 21, 2015

Intersect Error: Are you kidding me?

Introduction

This is a rant.  There is useful information in it.  (Don't get me started on the inanity of the phrase "useless information"!)

Today I was working on a project.  Many of my projects go this way: Work on it a little each month as that reporting cycle comes around.  The code for this one step worked just fine.  All it did was check to see if the cell that was just changed was part of a named range
Private Sub Workbook_SheetChange(ByVal Sh As Object, ByVal Target As Range)
    If Not Intersect(Target, Names("Ready_To_Publish").RefersToRange) Is Nothing Then
        If Names("Ready_To_Publish").RefersToRange.Value = True Then 
            ufPublish.Show
        End If
    End If
End Sub

As you can see I put the code in the Workbook_SheetChange event module.  It worked prior to this.  Today I saw something I had not seen before using the Intersect() function.

Trials and Errors

  • Using RANGE() instead of NAMES().
  • Being more specific 
    • Using Target.Application.Intersect because this project included binding to another Office product.
    • ThisWorkBook for Names() and Range().
  • Assigned Names().RefersToRange to a Range
    Dim rng as Range
    Set rng = Names("Ready_To_Publish").RefersToRange

Research says...

A quick Google, so quick I saw the problem before I clicked on any provided result: The Intersect() function does not work if the ranges are not on the same worksheet.

Rant 1: Logical Inconsistency!

Of course if two or more ranges are not on the same worksheet they do not intersect.  When two ranges don't intersect the result is Nothing!  Duh!

Rant 2: It's a 3 Dimensional World, Mr Gates!

Yup..Worksheets/spreadsheets are two dimensional: rows and columns.  However, Mr Gates, once you put multiple worksheets into a workbook you've created a three-dimensional object.  

You can select multiple Worksheets and make simultaneous changes to them.  I've screwed up by doing this accidentally!

Excel allows us to create a named range that crosses Worksheet boundaries.  Try it.  
  1. Create a Name in a brand new 3 sheet workbook
  2. Call it "TopLeft"
  3. Define it as "=Sheet1!A1+Sheet2!A1+Sheet3!A1"
You can do this programmatically as well.
Names.Add("TopLeft", "=Sheet1!A1+Sheet2!A1+Sheet3!A1")

But you can't do this...
Dim rng as Range
Set rng = Names("TopLeft").RefersToRange
Unless you want this...

Even though this works fine...
Dim rng as Range
Dim nm as Name
nm = Names.Add("OneSheetOnly", "=Sheet1!A1")
Set rng = Names("OneSheetOnly").RefersToRange

There are 3-D ranges.  These work fine if you want the same cells for each worksheet, but the definition of a Range is one or more blocks of contiguous cells (an "Area" in the Range Object Model).  Logically, a 3-D Range should be definable as a different set of blocks of contiguous cells on different worksheets.


Rant 3: Finish the Job!

What to do

  • Modify the Range object type to allow 3-D Ranges with different Area-ranges on each worksheet. 
  • Make Intersect() check for common worksheets
  • Allow Union() to create 3-D Ranges.
  • Modify Union() to allow empty ranges.  Currently when using the Union() function one must first test that neither is Nothing. A Union of something with nothing should be something.
  • Add a Subtract function to remove cells from a range

Why do it?

"It's the logical thing to do" is a fine argument for methodologists, philosophers, those with OCD, deep-thinking programmers/designers, and other ideologues.  In the end, "logic" isn't enough, unless that "logic" includes practical advantage, i.e. an improvement over what can currently be done.  Here are some thoughts.

As alluded to by calling the current state illogical and incomplete, finishing the job would inherently make programming simpler by eliminating illogical errors and repetition of code, e.g. checking if all Ranges <> Nothing before using Union() function.  Of course, efficiently using a developer's time isn't the end all and be all.  Simpler code begets less time in maintenance, where more effort is laid out already.

I had one project with Column header rows and Row header columns, as well as Row Total columns and Column Total Rows.  From worksheet to worksheet (and month to month) the endpoints of the headers could be different.  For the total rows and columns, they could not only have different end points for each, but different positions (i.e. columns/rows, respectively),  

The workaround was to create a Name scoped to each worksheet.  A Worksheet-scoped name has the form of <WorksheetName>!<Name>.  As a result, to clear, format or populate each of these commonly named Ranges, a "For Each...in Names" loop was necessary, testing whether each Name ended with the standard string.  It would much simpler to be able to create a Name that references ranges on multiple worksheets then execute a single  .Clear function/method.

Been busy...tale of two clients

Where have I been?

For the last 3 months I've been heads down on a project while still holding down a 25% commitment to other duties.  Meanwhile, the usual family and household duties kept me busy, too.

I had thought about trying to write during my few hours of relax time, but couldn't concentrate on Excel/VBA or any other topic for this blog.  Instead, I "wasted" my time talking politics on-line.

Client/Projects

I mentioned I had been heads down on a project.  It was one of those gap analysis projects, comparing current processes and systems with a future state, in preparation for migration.  I am now ramping up for a similar project for another company. 

Both companies are in the same industry, although one is small than the other.  In short, the second company is a direct competitor in one segment of the first, like a truck manufacturer versus General Motors.

Another difference is the smaller company is focused on the household/individual market whereas the larger one has products and services for households/individuals as well as companies from the smallest to the largest, government, and even through re-sellers and wholesalers.

The final difference is the age of the companies.  The next project is with a company that has been in business only 25 years, the larger for 100 years longer.

Resulting Difference: Venice v the NWO

I learned in college about Venetian government of the medieval and renaissance periods.  In short, it was based on the Roman's governmental structure and if something was not working right, they would add a bureau/department rather than change one that was already defined.  Likewise, as the older company added new products over the years they added new systems to support those products.  The result, in both cases, was highly specialized people with special terminology ingrained into their culture and a myriad tiny  bureaus (systems) solving small problems.  

During the past 20-30 years there has been a move to standard models for Information Technology and Systems, e.g. ITIL and CMM.  These are based on best practices and engineered at a high level to lead companies to defining technology infrastructure that is internally integrated and more compatible in the marketplace, i.e. communicating with suppliers and customers as well as using commercial software where appropriate.

Friday, June 5, 2015

How To: Late Bind (2) - Existing or New Instance

Introduction

In How To: Late Bind, the ability to either bind to an existing instance of or a new instance of another "foreign" Office application, e.g. binding an Excel project to an instance of Word, was covered.

What was not included was the ability to deal with instances when it is not known if an instance of the foreign application is already active.  Binding to an existing instance saves memory, i.e. only one instance of Word (or Excel or...) takes less memory than opening a second (or third) instance.

First with the old, then with a new

This is for the cases when an instance of the foreign application may be running and it is preferable to attach to it because this requires less memory.  The counterargument for this approach is it may interfere with other uses of that occurrence, e.g. editing a Word document that is not part of the project.  The balancing argument may be whether the host application will be doing a large amount of background (batch) work in the foreign application.

The following function is specific to Excel.

Function fn_appExcel() As Object
    On Error Resume Next
    Set fn_appExcel = GetObject(, "Excel.Application")
    If Err.Number <> 0 Then
        Set fn_appExcel = CreateObject("Excel.Application")
    End If
    On Error GoTo 0
End Function
Other MS-Office applications can have a similar function, or the whole thing can be generalized by using a parameter for the application name.
Function fn_appOffice(appName as String) As Object
    On Error Resume Next
    Set fn_appOffice= GetObject(,  appName  & ".Application")
    If Err.Number <> 0 Then
        Set fn_appOffice= CreateObject(appName  & ".Application")
    End If
    On Error GoTo 0
End Function

That one ... or a new one

In this case, the need is to have an instance open with a specific file.  First, try to bind to the instance already running and has the correct open file.  If it cannot be found, open a new instance and the file that is needed
Function fn_appExcelWithWorkbook(Optional strDirAndFileName as string) As Object
    On Error Resume Next
    Set fn_appExcel = GetObject(strDirAndFileName , "Excel.Application")
    If Err.Number <> 0 Then
        Set fn_appExcel = CreateObject("Excel.Application")
        fn_appExcel .Workbooks.Open strDirAndFileName 
    End If
    On Error GoTo 0
End Function

REMINDER: This structure should be limited to binding Word, Excel, and PowerPoint as foreign applications.  Binding to other applications (e.g. Project, Outlook, and Access) will be covered in one more more subsequent posts.Check the Cross Application Development page of this blog.

Tuesday, May 26, 2015

Remote Copy and Paste, version 2 (Optional Paste Special) ...Part 1

Introduction

In Remote Copy and Paste, version 1, I introduced the problem, i.e. copy-and-paste data then return to (or never leave) a worksheet.  In that post I provided a userform and code to do just that.

In this post I consider the requirements of full-blown tool then leverage the work already done to start meeting those requirements.  This post shows how to build each level and provides insights into the process I used.

Added Requirements

The problem with the first solution is it does not go far enough.  Here is the list of shortcomings (in my view) and the functionality that will cover these gaps. (NOTE: This list was modified, expanded and re-ordered.  It will be carried forward to a follow-up post, but may be modified, expanded, contracted, and re-ordered there.)
  1. It pastes all of  the source: values, formulas, formats, etc.  My understanding of the problem indicates the user would be well-served with Paste Values functionality, but it seems if I can add the full flexibility of Excel's Paste Special dialogue the added flexibility would be a great improvement.
  2. It clears the source and target fields of the user-form.  Although the code to do this can be commented out, it would be better to allow the user to choose whether to clear each field each time or to re-use the reference on succeeding uses.
    • User is copying from different ranges to the same target.  Each of the sources is for different departments or product lines, and the target is used for presentation or summarized on a "live" summary and/or chart.
    • User is copying the same information to different workbooks, as in a distribution of a reference sheet that has been updated and needs to be disseminated to multiple workbooks.
  3. The source and target fields and all checkboxes clear-able in one mouse-click.  Add a button to do so, and reset all other settings (e.g. checkboxes) to their defaults.
  4. Since there will now be settings carried forward from a previous usage, there should be the ability to reset controls to their states at the beginning of this usage, For example, if a checkbox was ON when the form opened or a range was in the Copy from or Paste To text boxes, those should be restored.
  5. At this point the only way to exit the form is to execute the copy/paste or to cancel.  Either way, the next time the form is opened it will either have the most recent settings (.i.e. checkboxes and, if the save-for-next-time checkboxes are on, the Copy from or Paste to values. Make it possible to close the form at any point, saving the current settings.
  6. A history of selected ranges should be retained and select-able from a drop-down, either on this user-form or one that pops-up when needed.
  7. The history of selected ranges should be clearable, en masse and individually.
  8. Named ranges must be typed in.  Add the ability to select Names from any open workbook.
  9. Adding the ability to reference names in any open workbook implies the value of being able to open workbooks while looking for the needed data range.
  10. A new source of data may have more or fewer rows than the previous one.  Old data should be cleared before the new data is pasted in.

Including Paste Special  

This covers #1 in the list of Added Requirements.  Finding the information on invoking the PasteSpecial dialogue wasCoding the was much easier than expected.  Changes consisted of
  • Adding a check box to the userform, cbxPasteSpecial 
  • Leveraging Excel's  Paste Special dialogue 
  • Using the True/False value of the new check box to control whether the code will use a Range.Copy <Destination>  command  or perform a Range.Copy followed by invoking Excel's  Paste Special dialogue 
  • Use Range variables (rngS and rngT) instead of using"Range(.reSource.Value)" or "Range(.reTarget.Value)" each time the associated range is needed.

Form with Use Paste Special Checkbox

The options were to add another Button control for "Copy/Paste Special", or a binary control (Checkbox, RadioButton, or ToggleButton).  I decided to go with the checkbox control because 
  • There are not multiple, mutually exclusive choices, as would be appropriate for a radioButton.
  • Off/On are more intuitive with less programming than a ToggleButton. 
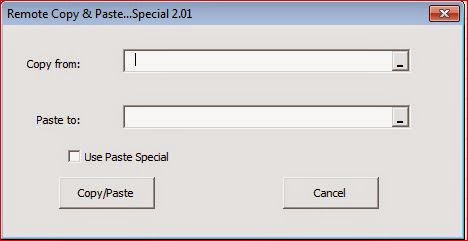
Figure 1 - Copy/Paste Special form, base functionality

Changes to Copy/Paste button Click Event Sub

Rather than using more instances of the Range(<objectname.value>) the code was refined to assign that statment to Range variables, rngS (Source or Copy range) & rngT (Target or Paste range).
The main change was to include an If/Else construct, using Copy with the PasteSpecial dialouge the when Use Paste Special checkbox (cbxPasteSpecial ).  Otherwise, the rngS.Copy rngTline is the same as before except for using the Range variables instead of Range(<objectname.value>) .

Changes are in bold.

Private Sub cbtnCPExecute_Click()
    Dim rngS As Range
    Dim rngT As Range
    With Me
        Set rngS = Range(.reSource.Value)
        Set rngT = Range(.reTarget.Value)
        If cbxPasteSpecial Then
            rngS.Copy
            rngT.Select
            Application.Dialogs(xlDialogPasteSpecial).Show
        Else
            rngS.Copy rngT
        End If
        .reSource.Value = ""
        .reTarget.Value = ""
        .Hide
    End With
    GoTo EXIT_cbtnCPExecute_Click
ERR_cbtnCPExecute_Click:
    MsgBox prompt:="Not able to perform Copy & Paste Remote.   Check the entries for 'Copy from:' 'and Paste to:'." _
            & "They must be valid range addresses or Named ranges.", _
           Title:="Remote Copy and Paste", _
           Buttons:=vbOKOnly + vbExclamation

EXIT_cbtnCPExecute_Click:
    On Error GoTo 0
End Sub

Keep Target and/or Source

As mentioned before, the code is easily modified (commenting out two lines) to make the form keep the previous entries for the next usage.  There are cases made for keeping one or the other from usage to usage, but it would be rare to copy/paste the same information to the same target.  Covering #2 in the list of new requirements, this allows for clearing all, keeping only one or the other, or keeping both,

Userform Changes

Two checkboxes were added to the userform,


First, there are module level data declarations.  These allow for the next usage after a Cancel to use the most recent successful execution

    Dim strPreviousTarget As String
    Dim strPreviousSource As String
    Dim booUsePreviousTarget As Boolean
    Dim booUsePreviousSource As Boolean
The Click event Sub for the cancel button resets to userform controls to what they had been at the beginning of the cycle
Private Sub cbtnCancel_Click()
    Application.EnableEvents = False
    With Me
        .reSource.Value = strPreviousSource
        .reTarget.Value = strPreviousTarget
        .cbxReUseSource = booUsePreviousSource
        .cbxReUseTarget = booUsePreviousTarget
        .Hide
    End With
    Application.EnableEvents = True
End Sub

The Click event Sub for the Copy/Paste button resets the values for the userform controls.
Private Sub cbtnCPExecute_Click()
    Dim rngS As Range
    Dim rngT As Range
    Application.EnableEvents = False
    With Me
        Set rngS = Range(.reSource.Value)
        Set rngT = Range(.reTarget.Value)
        If cbxPasteSpecial Then
            rngS.Copy
            rngT.Select
            Application.Dialogs(xlDialogPasteSpecial).Show
        Else
            rngS.Copy rngT
        End If
        If Not .cbxReUseSource.Value Then .reSource.Value = ""
        strPreviousSource = reSource.Value
        booUsePreviousSource = .cbxReUseSource.Value
        If Not .cbxReUseTarget.Value Then .reTarget.Value = ""
        strPreviousTarget = reTarget.Value
        booUsePreviousTarget = .cbxReUseTarget.Value
        .Hide
    End With
    GoTo EXIT_cbtnCPExecute_Click
ERR_cbtnCPExecute_Click:
    MsgBox prompt:="Not able to perform Copy & Paste Remote.   Check the entries for 'Copy from:' 'and Paste to:'." _
            & "They must be valid range addresses or Named ranges.", _
           Title:="Remote Copy and Paste", _
           Buttons:=vbOKOnly + vbExclamation
EXIT_cbtnCPExecute_Click:
    On Error GoTo 0
End Sub

Reset and Restore

Requirements #3 and #4 call for changing current settings either back to the default or to the state when the form was last opened.

New Buttons on the form

This calls for the addition of two buttons: Clear and Reset.  These are to be enabled under specfic curcumstances

  • Clear is to be enabled if either of the RefEdit controls have data in them or if any Checkbox controls are on (checked).
  • Reset is to be enabled if  RefEdit or Checkbox controls don't match the values they had when the form was most recently opened. 

Additional Variable

One piece of module-level data needs to be added.  It is needed for re-setting to the state the form was in when most recently opened.  This was not needed previously because the form holds the value from use-to-use.
    Dim booPasteSpecial As Boolean

The value for booPasteSpecial is set in cbtnCPExecute_Click along with booUsePreviousSource and booUsePreviousTarget .

Change to Copy/Paste Click Event Sub

In addition to the previously written code, the Click event subroutine for the Copy/Paste button needs to capture the current value of the checkbox for using Paste Special so it can be used for Reset button function during the next use of the form.  The RefEdit fields and other checkboxes are already being captured per the Keep Target and/or Source functionality

Private Sub cbtnCPExecute_Click()
    Dim rngS As Range
    Dim rngT As Range
    Application.EnableEvents = False
    With Me
        Set rngS = Range(.reSource.Value)
        Set rngT = Range(.reTarget.Value)
        If cbxPasteSpecial Then
            rngS.Copy
            rngT.Select
            Application.Dialogs(xlDialogPasteSpecial).Show
        Else
            rngS.Copy rngT
        End If
        If Not .cbxReUseSource.Value Then .reSource.Value = ""
        strPreviousSource = reSource.Value
        booUsePreviousSource = .cbxReUseSource.Value
        If Not .cbxReUseTarget.Value Then .reTarget.Value = ""
        strPreviousTarget = reTarget.Value
        booUsePreviousTarget = .cbxReUseTarget.Value
        booPasteSpecial = .cbxPasteSpecial.Value
        .Hide
    End With
    GoTo EXIT_cbtnCPExecute_Click
ERR_cbtnCPExecute_Click:
    MsgBox prompt:="Not able to perform Copy & Paste Remote.   Check the entries for 'Copy from:' 'and Paste to:'." _
            & "They must be valid range addresses or Named ranges.", _
           Title:="Remote Copy and Paste", _
           Buttons:=vbOKOnly + vbExclamation
EXIT_cbtnCPExecute_Click:
    On Error GoTo 0
End Sub

Change to Cancel Click Event

Now that we're capturing the value of the Checkbox for PasteSpecial, it needs to be included in the Sub for the Cancel CommandButton.  (hmmm...maybe this should have been in previous step...oh, well, onward and updward.)
Private Sub cbtnCancel_Click()
    Application.EnableEvents = False
    With Me
        .reSource.Value = strPreviousSource
        .reTarget.Value = strPreviousTarget
        .cbxReUseSource = booUsePreviousSource
        .cbxReUseTarget = booUsePreviousTarget
        .cbxPasteSpecial = booPasteSpecial
        .Hide
    End With
    Application.EnableEvents = True
End Sub

Clearing Values and Resetting to Original Values with CommandButton Click events

These are the crux of what I am trying to accomplish with this version: Clearing the values or making them revert to what they were the last time the form was open.  

Private Sub cbtnClear_Click()
    Application.EnableEvents = False
    With Me
        .reSource.Value = ""
        .cbxReUseSource.Value = False
        .reTarget.Value = ""
        .cbxReUseTarget.Value = False
        .cbxPasteSpecial.Value = False
        .Hide
    End With
    Application.EnableEvents = True
End Sub

Private Sub cbtnReset_Click()
    Application.EnableEvents = False
    With Me
        .reSource.Value = strPreviousSource
        .reTarget.Value = strPreviousTarget
        .cbxReUseSource = booUsePreviousSource
        .cbxReUseTarget = booUsePreviousTarget
        .cbxPasteSpecial = booPasteSpecial
    End With
    Application.EnableEvents = False
End Sub

Wait a gosh durn minute!

The code for cbtnReset_Click is almost identical to the code for cbtnCancel_Click.  The only difference is a .Hide.  Therefore, I put the common code in a separate Sub and shortened each <CommandButton>_Click Sub by several lines.

Private Sub cbtnCancel_Click()
    Call ResetFormValues
    Me.Hide
End Sub

Private Sub cbtnReset_Click()
    Call ResetFormValues
End Sub

Private Sub ResetFormValues()
    Application.EnableEvents = False
    With Me
        .reSource.Value = strPreviousSource
        .reTarget.Value = strPreviousTarget
        .cbxReUseSource = booUsePreviousSource
        .cbxReUseTarget = booUsePreviousTarget
        .cbxPasteSpecial = booPasteSpecial
        .Hide
    End With
    Application.EnableEvents = True
End Sub

Enabling and Disabling the Clear and Reset buttons

Every form should only have available to the user those controls that when the user "touches" it there is some effect.  If the Clear and Reset buttons are always enabled then the user may believe that by clicking on them something should happen.  This is logical, considering the vast majority of applications follow the principle stated 

Functions to Check Whether to Enable/Disable Clear and Reset Buttons

Two functions are added, one to check if the form has data (fn_booFormHasData), the other if the data has changed (fn_booFormHasChangedValues).   These will be invoked by a Sub to enable/disable the Clear and Reset buttons
  • fn_booFormHasData
    • Looks at the RefEdit  controls  to see if there is data in them, i.e. the length is greater than 0.
    • Looks at checkboxes to see if any are turn on.
  • fn_booFormHasChangedValues looks at RefEdit and checkboxes to see if they are different from the values in them when the form was most recently opened.
Function fn_booFormHasData() As Boolean
    With Me
        If Len(.reSource.Value) > 0 _
                Or Len(.reTarget.Value) > 0 _
                Or .cbxPasteSpecial.Value _
                Or .cbxReUseSource.Value _
                Or .cbxReUseTarget.Value Then
            fn_booFormHasData = True
        Else
            fn_booFormHasData = False
        End If
    End With
End Function

Function fn_booFormHasChangedValues()
    With Me
        If strPreviousSource <> reSource.Value _
                Or booUsePreviousSource = .cbxReUseSource.Value _
                Or strPreviousTarget <> reTarget.Value _
                Or booUsePreviousTarget <> .cbxReUseTarget.Value _
                Or booPasteSpecial <> .cbxPasteSpecial.Value Then
            fn_booFormHasChangedValues = True
        Else
            fn_booFormHasChangedValues = False
        End If
    End With
End Function

Subroutine to Enable/Disable Clear and Reset Buttons

This is another case of isolating common code in its own procedure.  The functions above are used by EnableDisableButtons to control whether the Clear and Reset buttons are enabled.

Sub EnableDisableButtons()
    With Me
        If fn_booFormHasData Then
            .cbtnClear.Enabled = True
        Else
            .cbtnClear.Enabled = False
        End If
        If fn_booFormHasChangedValues Then
            .cbnReset.Enabled = True
        Else
            .cbnReset.Enabled = False
        End If
    End With
End Sub

Checkbox Change Event Subroutines

These Subs simply call EnableDisableButtons each time one of the checkboxes are changed from ON to OFF or OFF to ON.

Private Sub cbxPasteSpecial_Change()
    Call EnableDisableButtons
End Sub

Private Sub cbxReUseSource_Change()
    Call EnableDisableButtons
End Sub

Private Sub cbxReUseTarget_Change()
    Call EnableDisableButtons
End Sub

Using Checkbox Enter Event as proxies for RefEdit Exit Event

For similar types of input controls (e.g. TextBoxes and ComboBoxes)  the <control>_Exit event Sub can be used to check if the field has changed, is empty, or otherwise validate it.  Because the RefEdit events are unreliable (per a whole slew of people more knowledgeable than I), I decided not to use any reSource_<event> or reTarget_<event> Subs. Instead, based on what I read from these more knowledgeable people, I used the Enter event subs for the checkbox controls.

NOTE:  According to this Google Search, there are alternatives to using RefEdit controls.  Because I am trying to get this project done quickly, am satisfied with the results I am getting, and am a bit leery of Class Modules because of my own skill level, I'll save using an alternative for later.

Before relying on this, it is important to establish the proper flow of tabbing from one field to the next.  Do this by selecting Tab Order from the VBE's View menu.
Figure x - Setting Tab Order
Now add the Enter event driven subs.
Private Sub cbxPasteSpecial_Enter()
    Call EnableDisableButtons
End SubPrivate
 Sub cbxReUseSource_Enter()
    Call EnableDisableButtons
End SubPrivate
 Sub cbxReUseTarget_Enter()
    Call EnableDisableButtons
End Sub

Known shortcoming...and two fixes

The only user action known at this point that does not trigger a call of EnableDisableButtons when it should, would be if the user moused from one of the RefEdit controls. Tabbing from field to field works fine, and so does the Enter key when the focus is on one of the RefEdit controls. 

Use the UserForm_MouseMove Event, Fix Number 1

The following overcomes this shortcoming by using the MouseMove event for the userform.  Whenever the mouse is moved across the form but between its controls, UserForm_MouseMove triggers.  The sub for the UserForm_MouseMove event then calls the same Sub as before. 

Private Sub UserForm_MouseMove(ByVal Button As Integer, ByVal Shift As Integer, ByVal X As Single, ByVal Y As Single)
    Call EnableDisableButtons
End Sub

Limit the MouseMove Event , an improvement to Fix Number 1

Using the UserForm_MouseMove event has the disadvantage of constantly triggering EnableDisableButtons, whenever the mouse is moving over the form, as long as it is not over a control. This may cause some which may cause some performance issues.

The objective of this improvement is to eliminate much of the form's area from the event and trip the mouse movement only to those areas where it might leave the RefEdit controls.  To limit the area where the MouseMove event is triggered, each RefEdit control is put inside it's own Frame control.
Figure x - Frames added to Control MouseMove Area (Design view)
The steps are
  • Expand the form to allow space to work.
  • Add Frame controls (frRefEditSource and frRefEditTarget)
    NOTE: Two frames were used instead of one to preserve the tab order
  • Move RefEdit controls inside their respective Frames
  • Re-size Frames so that a bare minimum of non-border shows around each RefEdit control. 
  • Move Frames to carry the RefEdit controls to their proper places
  • Format Frames be invisible when the form was shown
  • Modify Tab Order 

Code for Frames' MouseMove Events

The following Subs solve the problem of mousing out of the RefEdit controls without calling EnableDisableButtons excessively

Private Sub frRefEditSource_MouseMove(ByVal Button As Integer, ByVal Shift As Integer, ByVal X As Single, ByVal Y As Single)
    Call EnableDisableButtons
End Sub

Private Sub frRefEditTarget_MouseMove(ByVal Button As Integer, ByVal Shift As Integer, ByVal X As Single, ByVal Y As Single)
    Call EnableDisableButtons
End Sub

Where are we so far?

At this point the functionality has changed in the following ways
  1. Instead of a simple Paste, there is now an option to Paste Special
  2. Users can choose to keep settings, e.g. for the ranges, to be kept from one use to the next or cleared in between,
  3. The source and target fields and all checkboxes clear-able in one mouse-click. 
  4. The user can reset the form to how it looked when the user started this time, e.g. re-populate the range references.