Situation
Allen's email from ExcelTips this past weekend included a question from a reader who wanted to know how to control worksheet inputs of dates with time. It seems some of his users were typing in junk, which meant date/time calculations could not be done.Solutions Overview
A little reading between the lines indicated that in addition to forcing people to enter date/time in the right format there might also be need to add date/time stamps, alleviating the need to type in the date and time and completely avoiding the controversy. This led me to five different solutions, each with its own purpose and situational applicability. One of the solutions uses settings that can be made from the Ribbon's Data Menu, the other four depend on VBA and leverage the Worksheet's Event-triggered Subs.
- Data Validation can be used to force the entry of a date/time. One of the additional requirements, from Excel, is that the date/time must meet a criteria. There is no method that allows any and all date-times. This is an opportunity to support business rules, like a planning date/time must be later than the current date-time.
- Data Type validation using VBA. This would use the Worksheet_Change event, then make certain the entry was a date-time. What is included here goes two steps further, validating for the date range as possible with Data Validation the confirming that the time would be during a specific part of the day.
- Date-Time Stamp on Entry. This also uses the Worksheet_Change event, but instead of validating what was entered, once the new information is added the code puts the current date-time in a cell of the same row.
- Date-Time Stamp on Double-Click. As expected, this uses the Worksheet_DoubleClick Event to determine when to add the date-time stamp.
- Date-Time Stamp on completion. This is another use of the Worksheet_Change event, this time when all pertinent fields of the row are entered then a date-time stamp is added.
Data Validation (Ribbon)
This method uses the Data Validation available via the Data menu of the Excel Ribbon. It's alternative would be to write VBA Subs & Functions to do this work.
Why use this method
First and foremost, this method is often used because it is something the workbook developer can easily implement. Use of data validation for dates/times is an extension of the knowledge used for other data validation scenarios.
The advantages of using the Data Menu dialogue are
- There is no VBA code, meaning fewer security concerns
- Inputs can be controlled not only for data type but also for date ranges, e.g. a the date/time cannot be more than 30 days from now and must be after now.
The disadvantages, when compared to writing the needed functions and subs are centered around flexibility.
- A date-range must be specified, meaning one cannot simply force only data type for validation and the rules for the valid date/time range must be stated in a way that is flexible and follows the business needs.
- Date-ranges are simple before/after/between. Weekends are as valid as workdays and ranges for times of day cannot be specified, i.e. 11:00 PM would pass even if it is not during business hours.
How to use this method
To add Data Validation using this method,
- Select the range where the validation is needed. In this case, the named range "When".
- Access the Data menu, then click the Data Validation entry
- Enter the validation rules. In this case, since this is a forward-looking (planning) date, rather than one that is backward-looking (historical, reporting) we've set the acceptable range between now and 30 days from now.
 |
| Figure 1 - Date Validation - Next 30 Days |
- If desired, click on the Input Message and add a message to be displayed whenever a cell in the range is selected.
NOTE: If the Allow drop-down in the Settings tab is set to "Any value" this message will still be displayed.
 |
| Figure 2 - Data Validation - Input Message |
- If desired, click on the Error Alert and add a message to be displayed if the entry fails data validation.
 |
| Figure 3 -Data Validation - Error Alert |
NOTE: It is now a good time to protect the worksheet, as described below.
VBA Solutions
In addition to using the Data Validation feature, there are opportunities to leverage the Worksheet Events to validate or enter the dates as needed.
Set-up for VBA Solutions
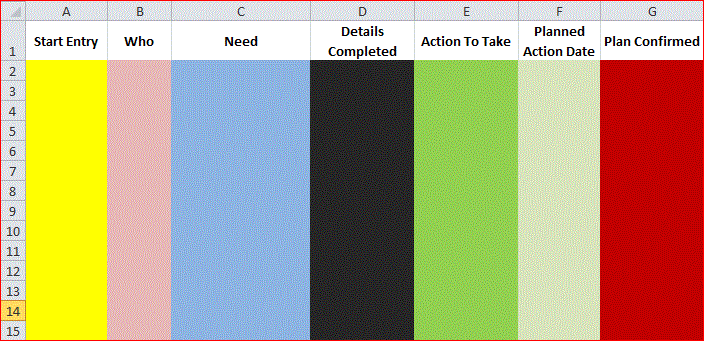
Worksheet Layout
The worksheet for this example has 6 columns, identify by the column labels below:
 |
| Figure 4 - Initial Worksheet |
- Start Entry. When the first entry of the row is completed, this will be populated with the date-time stamp.
- Uncontrolled Data entry columns. Free-form entry for the sake of this example. Could use data validation for either/both as well as additional columns. Two used to show the difference between the event when the first one is populated and when all of the user inputs of the row are complete.
- Who.
- Need.
- Details Completed. Documents with a date-time stamp when the Who and Need data entry columns for this row are both complete.
- Action to Take. Free form entry describing what action will be taken,
- Planned Action Date. Date/Time when the person making the entry expects to perform Action to Take. Entered by the user typing the date and time.
- Plan Confirmed. Field populated by a double click. Meaning could be when all entries are complete or when the action has been completed.
Named Ranges
To facilitate the code, it is important to name each column of data where entries might be made. For purposes of this example, entries are only on rows 2 through 9.
 |
| Figure 5 - Data Menu |
To name the range columns,
- Access the Formulas menu of the ribbon
- Select the table, i.e. A:F in this case.
- Click on Create from Selection.
- Click the OK Button
 |
| Figure 6 - Adding Range Names |
If you want to modify or review these later, click Name Manager on the Formulas menu.
 |
| Figure 7 - Name Manager with Named Ranges |
Controlling where Users May Type/Paste
Because we want the worksheet's events to trigger the population of three of the six columns, and allow the users to make entries in only the other three, we will need to unlock the cells where the inputs will be allowed (the default is Locked), then Protect the worksheet (the default is Unprotected).
To Unlock the cells that will be used for typed/pasted inputs,
- Select the ranges for What, When, and Who. (This can be done with all three at once or each individually.)
- Right-click, causing the context menu to be displayed.
- Click on Format Cells.
- When the Format Cells dialogue is displayed, click of the Protection tab if it is not the active tab.
- Change the "Locked" from checked to unchecked.
- Click OK.
 |
| Figure 8 - Cells Unlocked |
To Protect the Worksheet from unauthorized changes, in this case to limit the ability of users to add input to anywhere other than the three ranges set to unLocked.
NOTE: Although this is described here, it should not be done until after the Data Validation using the Data menu of the ribbon is done.
- Right-click on the worksheet's tab
- Select Protect from the context menu
 |
| Figure 9 - Worksheet Tab Context Menu |
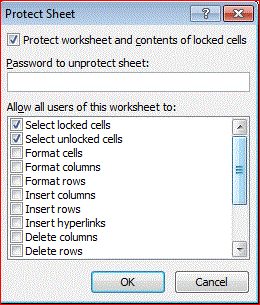 |
| Figure 10 - Protect Sheet Dialogue - Default |
- Optional: Scroll Down, and select Use Autofilter
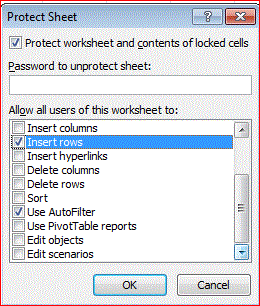 |
| Figure 11 - Worksheet Protect - Features Added |
- Enter a password, if desired.
- Click OK
Data Validation (VBA)
As an alternative to using Data Validation from the Data menu of the Ribbon, it is possible to create a more precise or flexible validation. Using the set-up from above, the Planned Action Date column is controlled for what is entered and feedback is given when it is not correct.
Private Sub Worksheet_Change(ByVal Target As Range)
If Not Intersect(Target, Range("Planned_Action_Date")) Is Nothing Then
If Not IsValidPlanDate(Intersect(Target, Range("Planned_Action_Date"))) Then
Target.Value = InputBox("The time needs to be between " _
& Format(DateAdd("h", EarliestStartHour, 0), "hh:mm") _
& " and " & Format(DateAdd("h", LatestStartHour, 0), "hh:mm") _
& ". Please re-enter", "When", Target.Formula)
End If
End If
End Sub
The validation routine is modularized from the event-driven Sub for re-use and because other parts of this solution also use the Worksheet_Change event Sub Including it there would make the that module unfocused and over-long.
Because the Function and invoking Sub use common constants, the following data declarations are made at the module level, i.e. before the first Function or Sub.
Const EarliestStartHour = 7
Const LatestStartHour = 18
Const MinDaysFromNow = 1
Const MaxDaysFromNow = 30
The following Function performs the validation. It can either be in a normal module, making it shareable with userforms or other worksheets, or within the worksheet's object module. In addition to contolling the range of dates that are valid, it also includes the ability to force entries to be during certain hours of the day.
Function IsValidPlanDate(Target As Range) As Boolean
IsValidPlanDate = False
If Len(Target.Value) = 0 Then
IsValidPlanDate = True
Else
If IsNumeric(Target.Value2) Then
If (IsDate(Target.Value) And Target.Value <> Int(Target.Value) _
And Target.Value - Int(Target.Value) > EarliestStartHour / 24 _
And Target.Value - Int(Target.Value) < LatestStartHour / 24 _
And Target.Value >= DateAdd("d", MinDaysFromNow, Int(Now())) _
And Target.Value <= DateAdd("d", MaxDaysFromNow, Int(Now()))) Then
IsValidPlanDate = True
End If
End If
End If
End Function
Date-Time Stamps
As mentioned above, reading the request further got me to thinking that date-time stamps might be more useful. Here are three ways to date-time stamp without using data validation.
...on First Entry
This adds a date-time stamp whenever a cell, perhaps one of several on the same row, is changed, assuming that change is to add information. As with the data-validation using VBA method, the needed code is written in the Worksheet_Change event Sub.
In this case, if information is added to the Who or Need column of a row a date-time stamp is put into the Start Entry column. This is akin a call log: when the receptionist starts entering information into the call log the date-time stamp marks the beginning of the call. The code is highlighted and included below with the code from the validation.
Private Sub Worksheet_Change(ByVal Target As Range)
Const EarliestStartHour = 7
Const LatestStartHour = 18
Application.EnableEvents = False
If Not Intersect(Target, Range("Planned_Action_Date")) Is Nothing Then
Call ValidatePlanDate(Intersect(Target, Range("Planned_Action_Date")))
Else
If Not Intersect(Target, Range("Who")) Is Nothing _
Or Not Intersect(Target, Range("What")) Is Nothing Then
If Len(Cells(Target.Row, Range("Start_Entry").Column).Value) = 0 Then
Worksheet.Unprotect
Cells(Target.Row, Range("Start_Entry").Column).Value = Now()
Worksheet.Protect
End If
End If
End If
Application.EnableEvents = True
End Sub
... on Completion of multiple entries
Another situation would be if a date-time stamp were desired after completing more than one entry.
Once again, the code goes into the Worksheet_Change event Sub and is highlighted below.
Private Sub Worksheet_Change(ByVal Target As Range)
Const EarliestStartHour = 7
Const LatestStartHour = 18
Application.EnableEvents = False
If Not Intersect(Target, Range("Planned_Action_Date")) Is Nothing Then
Call ValidatePlanDate(Intersect(Target, Range("Planned_Action_Date")))
Else
If Not Intersect(Target, Range("Who")) Is Nothing _
Or Not Intersect(Target, Range("What")) Is Nothing Then
If Len(Cells(Target.Row, Range("Start_Entry").Column).Value) = 0 Then
Worksheet.Unprotect
Cells(Target.Row, Range("Start_Entry").Column).Value = Now()
Worksheet.Protect
Else
If Len(Cells(Target.Row, Range("Who").Column).Value) > 0 _
And Len(Cells(Target.Row, Range("What").Column).Value) > 0 Then
Cells(Target.Row, Range("So_Far").Column).Value = Now()
End If
End If
End If
End If
Application.EnableEvents = True
End Sub
... on Double-Click
Another possible point when someone might want to put a date-time stamp is when information is confirmed, perhaps in a phone conversation. In this example, an action plan (no validation) and the date-time (validation) were added, then when action and date-time for the action are confirmed the user can double-click in the Plan Confirmed column of that row, resulting in the date-time stamp being populated.
Unlike the other code, this goes into the Worksheet_BeforeDoubleClick event Sub.
Private Sub Worksheet_BeforeDoubleClick(ByVal Target As Range, Cancel As Boolean)
If Not Intersect(Target, Range("Plan_Confirmed")) Is Nothing Then
Target.Parent.Unprotect
Target.Value = Now()
Cancel = True
Target.Parent.Protect
End If
No comments:
Post a Comment